Thursday, February 13, 2014

My Bow Tie Headband Ear Warmer...I LOVE IT!


Facing the cold weather.  You can make this too! I know many of my fans will ask me. Do you have the pattern? This is easy and simple to make.


BandRow 1: Ch20, (or the width you need) dc in 4th ch from hook, dc across to the end of row. Ch3, turn.Row 2: 1dc in 2nd st (chain 3 counts as your 1 st ), 1dc across to end of row. Ch3, turn.Repeat row 2 until you reach your head circumference. The headband will stretch a little, so take this intoaccount when making your length. Fasten off leaving a long tail for sewing ends together. In the tutorial Imade mine 54cms long. My head is 58 cm. The crochet band will stretch quite a bit because it’s dc.

Place 1 st row and last row together and sew ends together with a whip stitch (or slip stitch them together)making sure you sew under both loop edges.

Once you’ve finished sewing edges together, fasten off and sewends into your work to hide yarn end.


TabRow 1: Ch9, or the width you want your tab) 1hdc in 2nd ch from hook. 1hdc to the end of row. Ch2, turnRow 2: 1hdc into each st to the end of row.Repeat row 2 until you have your desired length. Do not finish off How to work out if your tab is long enough.Lay the head band flat making sure the seam is in the middle. Next make several folds, from bottom to top,(fold like you were folding a paper fan) Note top and bottom edges should be facing up. You should haveabout three folds gathered. Wrap your tab around the folded middle of these folds and it should be a tightfit. Turn your gathered piece over and pull both ends of your tab tight and sew up with whip stitch taking yourdarning needle under both loop edges.

If the tab isn’t a tight fit take out a row of your crochet.


Tuesday, February 11, 2014

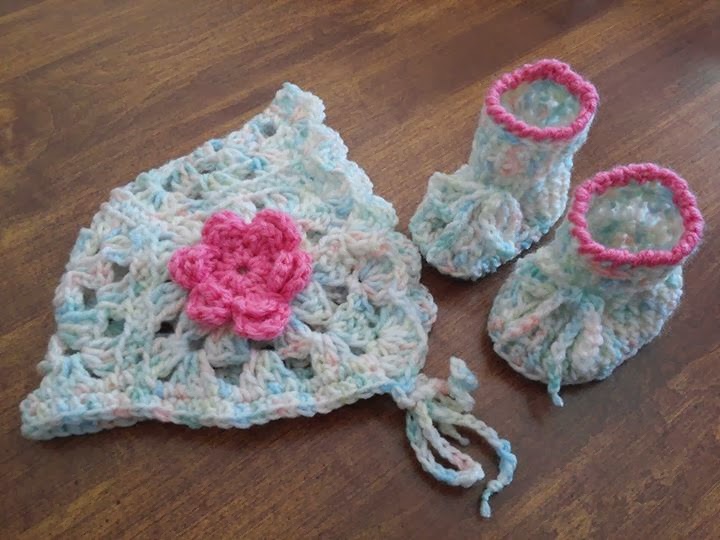
Granny Square Baby Bonnet and Booties

Hi! Fans, This is where you can make your own Granny Square Baby Bonnet and Booties.

Click on the link below.
http://crochet.about.com/od/babypatterns/a/granny-square-baby-bonnet-easy-crochet-pattern.htm


I spend a lot of time on the internet looking for new patterns.

I usually find a pattern and use the basic pattern but I add to it to be creative. Here is a picture of one I made.

 
Grab this at my shop. It is newly listed and I only have one. I will be making more.
 

Monday, February 10, 2014

Giving is a gift.


I have made so many of my Crochet Items. I give them to my friends and people who I meet and associate with. It's just a blessing when I give something away what I have made. It really puts a smile when someone receives a gift unexpected.


Saturday, February 8, 2014

Free Pattern ( Ravely.com) Easy Crochet organizer


Someone asked me they would like to make themselves a crochet organizer for their hooks to store. Here is the website to find this pattern. I used the basic stitches but I improvised by designing my own crochet case. Each one I make has a unique look and never the same. Here it is: http://www.ravelry.com/patterns/library/easy-crochet-hook-case-2

Friday, February 7, 2014

Here is a free pattern Set for an Infant

Follow the easy step-by-step instructions of this vintage crochet pattern to make this classic baby set. There is absolutely no charge for personal use of this crochet pattern for a sacque, baby bonnet, and baby booties.

Crochet a Set for an Infant!

Crochet Baby Set - Agda Baby Set


REQUIRED MATERIALS Sacque - 4 1-oz. Balls 3-ply Baby Yarn
Bonnet - 1 1/2 l-oz. Ball 4-ply Baby Yarn
Booties - 1 1-oz. Ball 3-ply Baby Yarn
Size 2 White Crochet Hook STEP-BY-STEP INSTRUCTIONS Crocheting the Sacque Starting at neck edge, ch 66. Row 1 - Skip 1 st, work 1 s c in each remaining ch st (65 sts). Ch. 1 turn. Row 2 - Work 1 s c in each of first 12 sts; 3 s c in next st; 1 s c in each of next 6 sts; 3 s c in next st; 1 s c in each of next 25 sts; 3 s c in next st; 1 s c in each of next 6 sts; 3 s c in next st; 1 s c in each of last 12 sts; ch 1 turn. Row 3 - 1 s c in each of first 13 sts; 3 s c in next st; 1 s c in each of next 8 sts; 3 s c in next st; 1 s c in each of next 27 sts; 3 s c in next st; 1 s c in each of next 8 sts; 3 s c in next st; 1 s c in each of last 13 sts. Ch 1 turn. Row 4 - 1 s c in each of first 14 sts; 3 s c in next st; 1 s c in each of next 10 sts; 3 s c in next st; 1 s c in each of next 29 sts; 3 s c in next st; 1 s c in each of next 10 sts; 3 s c in next st; 1 s c in each of last 14 sts. Continue increasing as given above, until 17 rows in all have been made (193 sts). Do not break yarn. With a separate strand of yarn, join front and back of yoke at underarms with a ch of 6, skipping 38 sts across each shoulder. On the next row, work in pattern across the 129 sts as follows (wrong side): Row 1 - Draw up a long loop in first st (about 3/4 inch), Y O hook and through the loop, ch 1, * skip 3 sts, work 3 d c in next st, ch 1, 3 d c in same st (shell st), skip 3 sts, Y O hook, draw up a loop in next st, Y O hook and through 3 loops on hook, ch 1; repeat from * across row. Row 2 - Draw up a long loop, Y O and through the loop, ch 1, * work 1 shell st over the ch 1 in center of shell of row below, Y O, draw up a loop in center of loop of row below, Y O and through 3 loops on hook, ch 1; repeat from * across row (16 shell sts), drawing up last loop through the ch 1 at end of row instead of the loop. Repeat row 2 until 15 rows in all have been made. Sleeves: On wrong side of garment, join yarn into the 4th ch st at underarm. Draw up a loop in next st, ch 1, skip 4 sts, * work a shell st into next st across shoulder edge, skip 3 sts, Y O hook and draw up a loop in next st, Y O, and through the 3 loops on hook, skip 3 sts; repeat from * skipping 4 sts before drawing up last loop at end of row (5 shell sts). Work back and forth in pattern until 11 rows in all have been made. Ch 1 turn. Cuff: Work 1 s c in each d c of row below, then work back and forth in s c, st for st, for 7 rows. Work 1 row of picot sts. Fasten off. Work 1 row of beading around neck edge. Work 1 row of picot sts around entire sacque. Sew sleeve seams. Crocheting the Bonnet Ch. 4. Join together with a slip st to form a ring. Row 1 - Work 6 s c in ring. Row 2 - Work 2 s c in each st. Row 3 - * Work 1 s c in each of first 2 sts, 1 d c in 2nd st of previous row: repeat from * 5 times. Row 4 - * Work 1 s c in each of first 3 sts, then work 1 d c around the d c of previous row, inserting the hook sideways; repeat from * 5 times. Row 5 - * Work 1 s c in each of first 4 sts, 1 d c around the d c of previous row; repeat from * 5 times. Continue increasing as described above, until there are 12 sts in each gore. Omitting one gore for back of neck, work back and forth in shell pattern for 9 rows or desired depth. Work 1 row of picot sts across front edge. Neckband: Work 40 s c across neck edge, then work 4 more rows of s c, st for st. Fasten off. Crocheting the Booties Work as given for Infant Star Stitch Set for instep and foot part only, then work as follows: Join yarn at center back of boot. Draw up a loop, work back and forth in pattern as given for sacque for 6 rows, having 4 shell sts in a row. Work 1 row of picot sts across top of bootie. Fasten off.
- See more at: http://www.antiquecrochetpatterns.com/agda-set.html#sthash.epHde3fL.dpuf


This site is great to get free patterns. I am actually going to make this one day.

Laudiaann

Crochet Baby Booties Are now Listed in my Shop.

Baby booties are a great way of ensuring that your child's feet are covered, warm, and protected. Since infants cannot walk, baby booties are designed with the comfort and warmth of the child in mind. Crocheted baby booties are perfect for keeping little toes warm in the winter. Crochet booties are also much cheaper than shoes. Since infants grow so quickly, they will grow out of shoes quickly. Baby booties, on the other hand, have more stretch in them, and they are relatively cheap to make. Baby booties are small (naturally) and even though there is some shaping involved they are still relatively easy to crochet and it does not take very long to make a pair. They are a quick and simple crochet gift, for any time of year, that you can customize for any age, size or gender. And on top of all that, baby booties are super cute! Often crocheted with bright decorative colors or fanciful designs, baby booties are positively adorable and stylish. No wonder they are so popular! Perfect for rest, or play, baby booties are an essential part of a baby's wardrobe and a pair of them makes a wonderful gift for the newborn.

http://etsy.com/shop/deezascrochet
 
 
I will be making more booties and selling them at my shop so stay posted and updated.

Shop at my Etsy Shop

Find crochet gift ideas for the crocheters on your gift list. For birthdays, Christmas, Valentine's Day, for women or for men, we'll help you find perfect crochet presents for everyone on your list!